


Summary
The Battle of Halidon Hill took place on 19 July 1333 when a Scottish army under Sir Archibald Douglas attacked an English army commanded by King Edward III of England (r. 1327–1377) and was heavily defeated. The year before, Edward Balliol had seized the Scottish Crown from five-year-old David II (r. 1329–1371), surreptitiously supported by Edward III. This marked the start of the Second War of Scottish Independence. Balliol was shortly expelled from Scotland by a popular uprising, which Edward III used as a casus belli, invading Scotland in 1333. The immediate target was the strategically-important border town of Berwick-upon-Tweed, which the English besieged in March.
| Battle of Halidon Hill | |||||||
|---|---|---|---|---|---|---|---|
| Part of the Second War of Scottish Independence | |||||||
| |||||||
| Belligerents | |||||||
| Kingdom of Scotland | Kingdom of England | ||||||
| Commanders and leaders | |||||||
| Sir Archibald Douglas † | King Edward III | ||||||
| Strength | |||||||
| 15,000 | Fewer than 10,000 | ||||||
| Casualties and losses | |||||||
| Several thousand | 7 or 14 | ||||||
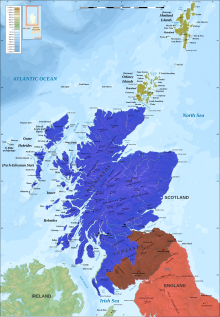
 class=notpageimage| Location of the battle within England | |||||||
A large Scottish army advanced to relieve the town. They attempted and failed to draw the English away from Berwick. By mid-July, knowing Berwick was on the verge of surrender and aware they were much stronger than the English, the Scots attacked. They unsuccessfully manoeuvred for position and then launched an assault on the English, who had taken up a favourable defensive position. English longbowmen caused heavy Scottish casualties during their approach, and when the Scots came into contact with the English infantry, the fight was short. The Scottish formations collapsed and the Scots fled in disorder. The English men-at-arms mounted and pursued the Scots for eight miles, causing further heavy casualties. The Scottish commander and many of the Scots' senior nobility were killed during the battle.
Berwick surrendered on terms the next day. Balliol was reinstalled as king of Scotland after ceding much of his territory to Edward III and agreeing to do homage for the balance. Balliol's opponents would not admit defeat and he was deposed again in 1334, restored in 1335 and deposed once again in 1336. In 1337 the Hundred Years' War broke out between France and England which allowed David II to consolidate his position in Scotland. In 1346 the Scots were decisively beaten at the Battle of Neville's Cross with heavy loss and David was captured. It was eleven years before terms were agreed for David's release. They included an Anglo-Scottish truce, which lasted for four decades and marked the end of the Second War of Scottish Independence.
Background edit
The First War of Scottish Independence between England and Scotland began in March 1296, when Edward I of England (r. 1272–1307) stormed and sacked the Scottish border town of Berwick as a prelude to his invasion of Scotland.[1] After the 30 years of warfare that followed, the newly crowned 14-year-old King Edward III (r. 1327–1377) was nearly captured in the English disaster at Stanhope Park. This brought his regents, Isabella of France and Roger Mortimer, to the negotiating table. They agreed to the Treaty of Northampton with Robert Bruce (r. 1306–1329) in 1328 but this treaty was widely resented in England and commonly known as turpis pax, "the shameful peace". Some Scottish nobles refused to swear fealty to Bruce and were disinherited; they left Scotland to join forces with Edward Balliol, son of King John I of Scotland (r. 1292–1296),[2] whom Edward I had deposed in 1296.[3]
Robert Bruce died in 1329; his heir was 5-year-old David II (r. 1329–1371). In 1331, under the leadership of Edward Balliol and Henry Beaumont, Earl of Buchan, the disinherited Scottish nobles gathered in Yorkshire and plotted an invasion of Scotland. Edward III was aware of the scheme and officially forbade it. The reality was different, as Edward was happy to cause trouble for his northern neighbour. He insisted Balliol not invade Scotland overland from England but ignored his forces sailing for Scotland from Yorkshire ports on 31 July 1332. The Scots were aware of the situation and were waiting for Balliol. David II's regent was an experienced old soldier, Thomas Randolph, Earl of Moray. He had prepared for Balliol and Beaumont, but died ten days before they sailed.[4][5]
Five days after landing in Fife, Balliol's predominantly English force of some 2,000 men met the Scottish army of 15,000–40,000 men and the latter were crushed at the Battle of Dupplin Moor, 2 miles (3 km) south of the Scottish capital, Perth. Thousands of Scots died, including much of the nobility of the realm. Balliol was crowned king of Scotland at Scone – the traditional place of coronation for Scottish monarchs[6] – on 24 September 1332.[3] Almost immediately, Balliol granted Edward Scottish estates to a value of £2,000 (£1,800,000 in 2024 terms[note 1]), which included "the town, castle and county of Berwick".[3] Balliol's support within Scotland was limited and he was subject to constant military challenge; for example on 7 October David's supporters recaptured Perth and destroyed its walls. On 16 December, less than three months after his coronation, Balliol was ambushed by supporters of David II at the Battle of Annan. He fled to England half-dressed and riding bareback. He appealed to Edward for assistance.[7][8]
Edward dropped all pretence of neutrality, recognised Balliol as king of Scotland and made ready for war.[9] The English parliament met at York and debated the situation for five days without conclusion. Edward promised to discuss the matter with both Pope John XXII and King Philip VI of France (r. 1328–1350). Possibly to prevent the Scots from taking the initiative, England began openly preparing for war, while announcing it was Scotland which was preparing to invade England.[10][11]
Prelude edit
Edward's chosen target was Berwick: a Scottish town on the Anglo-Scottish border, astride the main invasion and trade route in either direction.[12] According to a contemporary chronicle, Berwick was "so populous and of such trade that it might justly be called another Alexandria, whose riches were the sea and the waters its walls".[13] It was the most successful trading town in Scotland, and the duty on wool which passed through it was the Scottish Crown's largest single source of income.[14] In the Middle Ages, it was the gateway from Scotland to the English eastern march.[12] Edward hoped the possibility of losing it would draw the Scots into a set-piece battle, which he anticipated winning.[15] During centuries of war between the two nations battles had been rare, as the Scots preferred guerrilla tactics and border raiding into England.[16][17] Berwick was one of the few targets which might bring the Scots to battle as, in the words of the historian Clifford Rogers, "abandoning it was almost unthinkable".[17]

Weapons and supplies were gathered as the Scots made arrangements for the defence of Berwick.[18] The town walls stretched for 2 miles (3 kilometres) and were up to 40 inches (3 feet; 1 metre) thick and 22 feet (6.7 metres) high. They were protected by towers, each up to 60 feet (20 metres) tall.[19][note 2] Berwick Castle was to the west of the town, separated by a broad moat, making the town and castle independent strongholds.[21] Berwick was well-defended, well-stocked with provisions and materiel, and expected to be able to withstand a long siege.[22]
Berwick under siege edit

Balliol, in command of the disinherited Scottish lords and some English magnates, crossed the border on 10 March 1333.[23] He marched through Roxburghshire, burning and pillaging as he went. He reached Berwick in late March and cut it off by land. Edward's navy had already isolated it by sea. Balliol and the nobles accompanying him are said to have sworn not to withdraw until Berwick had fallen.[24]
Edward arrived at Berwick with the main English army on 9 May,[25] after leaving Queen Philippa at Bamburgh Castle, 15 miles (24 kilometres) south of Berwick.[26] Balliol had been at Berwick for six weeks and had placed the town under close siege. Trenches had been dug, four underground pipes supplying water to the town were cut and all communication with the hinterland prevented.[27][28] A scorched-earth policy was applied to the surrounding area to deny supplies for the town if an opportunity to break the siege occurred. This pillaging of the countryside also added to the English army's supplies.[28] The besieging army included troops raised in the Welsh Marches and the Midlands, as well as levies from the north which had already mustered on account of the earlier Scottish raids. By the end of the month, this force had been augmented by noble retinues, a muster at Newcastle, and the assembly of the English fleet in the River Tyne.[29] Accompanying the army were craftsmen to build siege engines.[30] Edward had arranged for the combined army to be supplied by sea through the small port of Tweedmouth.[29]
Sir Archibald Douglas was Guardian of the Realm for the underage David[18] and he assembled an army north of the border. The chronicles of the time variously claim they numbered 14,629, 30,000, 40,000, 80,000, 90,000, more than 100,000 or that they outnumbered the English five to one.[31] Rogers believes that around 15,000 is plausible.[32] A high proportion were mounted, but nearly all of them would dismount when fighting was expected.[31] The Scots launched minor raids into Cumberland, which achieved little.[33] Douglas assembled ever more troops, rather than using those he already had to attempt to draw the English away from Berwick. This inactivity contrasts with Robert Bruce's swift response to the English siege of Berwick in 1319.[27][34] Edward exploited the Cumberland raids to claim that his invasion was a response to them.[33]
By the end of June attacks by land and sea had brought Berwick to a state of ruin and the garrison close to exhaustion.[27][35][note 3] It is believed that a desire for a respite from the plunging fire of the two large counterweight trebuchets used by the English was a significant factor in causing the town's governor, Sir Alexander Seton, to request a short truce from Edward.[30][35] This was granted, but only on the condition that he surrender if not relieved by 11 July. Seton's son, Thomas, was to be a hostage to the agreement, along with eleven others.[37][38]
Relief force edit

Douglas was now faced with a choice of abandoning Berwick to fall to the English or attempting to go to its relief and risking a pitched battle.[27] The modern historian Ranald Nicholson considers "If Berwick were to be saved immediate action on the part of the Scottish guardian was unavoidable".[39] The army Douglas had spent so much time gathering was now compelled to take to the field.[27] Douglas entered England on 11 July, the last day of Seton's truce.[39] He advanced eastwards to Tweedmouth and destroyed it in sight of the English army. Edward did not move.[27]
On the afternoon of 12 July Sir William Keith, with Sir Alexander Gray and Sir William Prenderguest, led a force of around 200 Scottish cavalry towards Berwick. With some difficulty, they forced their way across the ruins of a bridge over the Tweed to the north bank and made their way into the town.[34] Douglas considered the town relieved. On 13 July he sent messages to Edward calling on him to depart, threatening that if he failed to do so, the Scots army would devastate England. Edward ignored them.[40][41] The defenders argued that Keith's 200 horsemen constituted a relief according to the truce and therefore they did not have to surrender. Edward stated this was not the case: they had to be relieved directly from Scotland – literally from the direction of Scotland – whereas Keith, Gray and Prenderguest had approached Berwick from the direction of England.[42] Edward ruled that the truce agreement had been breached – the town having neither surrendered nor been relieved. A gallows was constructed in sight of the town walls and, as the highest-ranking hostage, Thomas Seton was hanged while his parents watched. Edward issued instructions that each day the town failed to surrender, another two hostages should be hanged.[42][note 4]
Keith took over command of the town from Seton and concluded a fresh truce on 15 July, promising to surrender if not relieved by sunset on 19 July.[27] The truce comprised two indentures, one between Edward and the town of Berwick and the other between Edward and Patrick Dunbar, Earl of March, the Keeper of Berwick Castle. It defined circumstances in which relief would or would not be considered to have occurred. The terms of surrender were not unconditional. The town was to be returned to English soil and law but the inhabitants were to be allowed to leave, with their goods and chattels, under a safe conduct from Edward. All members of the garrison would also be given free passage. Relief was defined as one of three events: 200 Scottish men-at-arms fighting their way into Berwick; the Scottish army forcing its way across a specific stretch of the River Tweed; or, defeat of the English army in open battle on Scottish soil.[43] The garrison was also permitted to sortie to assist any relief attempt by the main Scottish army.[32] On concluding the new treaty, Keith was allowed to immediately leave Berwick, travel to wherever the Guardian of Scotland happened to be, advise him of the terms of the treaty, and return safely to Berwick.[43]
By this time Douglas had marched south to Bamburgh, where Edward's queen Philippa was still staying, and besieged it; Douglas hoped this would cause Edward to break off his siege.[40] In 1319 Edward's father, Edward II, had broken off a siege of Berwick after a Scottish army had advanced on York, where his queen was staying, and devastated Yorkshire.[44] Edward ignored the threat to Bamburgh[40][45] as the Scots did not have the time to construct the kind of equipment that would be necessary to take the fortress by assault. They devastated the countryside but Edward ignored this too.[27] He positioned the English army on Halidon Hill, a small rise of some 600 feet (180 metres), 2 miles (3.2 km) to the north-west of Berwick, which gives an excellent view of the town and the vicinity. From this vantage point, he dominated the crossing of the Tweed specified in the indentures and would have been able to attack the flank of any force of men-at-arms attempting to enter Berwick.[43] A contemporary account estimates the size of the English army at 10,000 men,[46] although Rogers suggests desertion and the expiry of terms of service would have reduced it to significantly fewer and that it is possible the English were outnumbered two to one.[47] Edward detached 700 men-at-arms and an unknown number of archers and infantry to guard against a sortie by the Berwick garrison.[48][49] Receiving Keith's news, Douglas felt his only option was to engage the English in battle.[43]
Battle edit
Scottish advance edit
Crossing the Tweed to the west of the English position, the Scottish army reached the town of Duns, 15 miles (24 km) from Berwick, on 18 July.[50] On the following day it approached Halidon Hill from the north-west.[27] This approach put the English between the Scottish army and the Tweed; an English defeat would probably be a disaster.[51] The Scots halted on a nearby hill and formed up in a defensive formation. They expected the English to come to them, but instead Edward deployed his army as infantry, with his men-at-arms and spearmen in three divisions, which were known as "battles", arrayed in an arc. The many longbowmen in the army were deployed evenly on each flank. With both sides seeking the advantage of a defensive posture, a stalemate ensued.[52]
A contemporary chronicler reported Edward as being "joyous and happy" that he had drawn the Scots into an open battle.[48] The state of his army's morale is less certain: they were outnumbered and had no ready path of retreat. One chronicler reported they were of "brave spirit", another that they were "very cast down". Scottish morale was high: they had the larger force and all of the leading figures of the nation were present and urging them on. Douglas gave a rousing speech and ordered that no prisoners should be taken. The Scots challenged the English to send out a champion to engage in single combat. Robert Benhale of Norfolk fought a Scottish champion named Turnbull and his large dog between the armies and killed both. Still neither army moved.[52][53]
One contemporary account claims the Scots were waiting for high tide on the Tweed, to minimise the possibility of English escapees after a Scottish victory.[54] The Scots were under pressure to attack and defeat the English to prevent the fall of Berwick, while the English knew that if no battle took place Berwick would be obliged to surrender to them the next day.[48] Modern historians agree that the prudent course of action for the Scots would have been to withdraw and wait for a better opportunity to fight. However, Jonathan Sumption points out that this would have guaranteed the loss of Berwick.[27] Rogers states that "it may seem surprising" that the Scots attacked even under these circumstances.[47] Kelly DeVries writes that "the Scots ... did not want to fight" but were "forced to respond".[55] A little after noon Douglas ordered an assault.[51][56]
Scottish attack edit
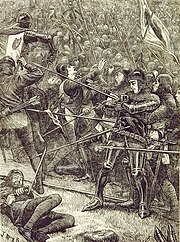
To engage the English, the Scots had to advance downhill, cross a large area of marshy ground and then climb the northern slope of Halidon Hill.[50][51] The Scots advanced to the sound of horns, drums, bagpipes and war cries. They were reported as "covering the ground like locusts".[51] The Battle of Dupplin Moor the previous year had shown how vulnerable the Scots were to English longbows[27] and so they came through the marshy hollow and up the north slope of Halidon Hill as fast as they could while still maintaining formation, to minimise the time during which they were exposed to English arrow fire.[51] The arrows fell on the Scots "as thick as motes in a sun beam", according to an unnamed contemporary.[57] The Lanercost Chronicle reported "The Scots who marched in the front were so wounded in the face and blinded by the multitude of English arrows that they could not help themselves, and soon began to turn their faces away from the blows of the arrows and fall."[58] The Scots suffered many casualties to the English archers and the lower reaches of the hill were littered with dead and wounded.[57] A contemporary chronicle states that thousands of Scots fell during this stage of the battle.[59] The survivors continued upwards, towards the waiting English.[57]
The English were disheartened by the size of the Scottish army but, aware they had no avenue of escape, stood their ground.[51] The Scots were organised in their traditional schiltrons – tightly packed pike formations. The leading schiltron, commanded by the Earl of Moray, attacked the English division commanded by Balliol. A following schiltron attacked Edward's division and a third, led by the Earls of Sutherland and Ross assailed the division of Henry Beaumont.[60] The Scots had failed to reconnoitre the English position, or had been prevented from doing so, and its strength took them by surprise. They were also tired before they launched their assault, having marched 60 miles (100 km) in the previous 48 hours, and had taken heavy casualties during their approach.[61] As the Scottish schiltrons engaged the English divisions the English archers continued to fire into the flanks of the Scots from close range. A chronicler noted "The English archers destroyed and injured them so ... and soon they were thrown into confusion."[62]
The period of close-quarters fighting was brief. Shortly after charging into contact the Scots attacking Balliol's division broke and routed. Almost immediately the schiltron facing Edward also broke. The third schiltron, which was tasked with fighting its way through to Berwick and so preventing its surrender, fought on "with the ferocity of lions" according to an English chronicle. More than 500 Scots were killed in this fight, including both of the schiltron's noble commanders.[60]
Scottish rout edit
With two of the three Scottish schiltrons fleeing, the English men-at-arms from Balliol's and Edward's division mounted their horses, which had been held to the rear, and pursued.[63] From their position on the hill where the Scots had taken up their original defensive position the Scottish camp followers could see what was happening and made off on the Scottish horses, which had been left there.[27][64] This forced the Scottish soldiers to either try and outrun the mounted English on foot, or band into small groups and attempt to fight off the English knights. In either case they were easily ridden down. Few prisoners were taken; most Scots who surrendered were killed, on Edward's orders, and some drowned when they fled into the sea. At some point during this pursuit the third Scottish schiltron collapsed and joined the rout. The Scots were chased for 8 miles (13 km) and suffered very heavy casualties.[63][64] About a hundred Scots who had been taken prisoner against Edward's orders were beheaded the next morning, 20 July.[65] This was the date on which Berwick's truce expired, and the town and the castle surrendered on the terms in the indentures.[27][66]
The English chronicles number the Scottish dead at between 35,000 and 60,000. Scottish chronicles give 10,000 killed.[67] Of the nine most-senior Scots present at the battle, six were killed, including Douglas. One Scottish account says that of 203 men-at-arms made knights ("dubbed") immediately before the battle, only 5 survived. Many of the figures given are clearly greatly exaggerated, and Rogers suggests the total of Scottish dead may have been approximately 2,900.[68] English casualties were reported in some chronicles as 14, while others give a lower figure of 7.[69][70]
Aftermath edit
The English believed the battle had ended the war with Scotland[72] and Edward left for the south. Balliol and his allies rapidly quelled any remaining resistance in Scotland. They proceeded north and held a parliament at the Scottish capital, Perth, in October 1333, where Balliol restored lands to the "disinherited" nobles who had helped him to the throne the previous year. In doing so he dispossessed a new generation of Scots nobility of their land, thus ensuring continued conflict.[73] Balliol had at least nominal control of most of Scotland[74] and at one point only four fortifications remained in the hands of David II's partisans.[75] On 19 June 1334, Balliol did homage to Edward for Scotland, after formally ceding to England the eight counties of south-east Scotland.[26] David supporters would not admit defeat and Balliol was deposed later in 1334. Edward led a winter campaign and Balliol was restored in 1335. Balliol was deposed once again in 1336, and Edward again campaigned widely across Scotland. In 1337 the Hundred Years' War broke out with France and English efforts were concentrated on this front, allowing the young King David to consolidate his position in Scotland.[74][76]
In 1346 Edward led an English army across northern France, winning the Battle of Crécy and besieging Calais.[77] Encouraged by the French King the Scots invaded England with a large army, certain that few English troops would be left to defend the rich northern English cities.[78] The Scots were decisively beaten at the Battle of Neville's Cross with heavy loss and their king[79] was captured.[80] It was eleven years before terms were agreed for David's release.[81] His ransom was the very large sum of 100,000 marks, to be paid over ten years, on 24 June (St. John the Baptist's Day) each year, during which an Anglo-Scottish truce prohibited any Scottish citizen from bearing arms against Edward III or any of his men.[78] This truce lasted for four decades and marked the end of the Second War of Scottish Independence.[82]
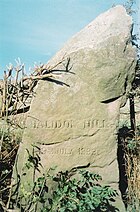
Battlefield today edit
The site of the battle has been entered in the Register of Historic Battlefields by Historic England due to its special historic interest. The uncultivated scrub and marsh of 1333 was enclosed around 1800, drained and now consists of agricultural fields.[83] There is a rough stone monument to the battle near the highest point of the hill with an incised inscription, "Halidon Hill 19th July 1333".[84]
Notes, citations and sources edit
Notes edit
- ^ UK Retail Price Index inflation figures are based on data from Clark, Gregory (2017). "The Annual RPI and Average Earnings for Britain, 1209 to Present (New Series)". MeasuringWorth. Retrieved 11 June 2022.
- ^ The surviving town walls are mostly of a later date and are considerably smaller than those of 1333.[20]
- ^ The Brut Chronicle remarks that the English "made meny assautes with gonnes and with othere engynes to the toune, wherwith thai destroiede meny a fair hous; and cherches also were beten adoune unto the erthe, with gret stones, and spitouse comyng out of gonnes and of othere gynnes."[36] Later petitions from the town to the King also mention churches and houses having been "cast down" during the siege.[37]
- ^ It has been suggested that Alexander Seton had little to lose: he had "already lost one son fighting against Balliol in 1332 and a second in the defence of the town [so] Sir Alexander Seton did not shrink from sacrificing a third".[42]
- ^ Based on Sumption.[71]
Citations edit
- ^ Barrow 1965, pp. 99–100.
- ^ Weir 2006, p. 314.
- ^ a b c Nicholson 1961, p. 19.
- ^ Sumption 1990, pp. 124, 126.
- ^ DeVries 1998, p. 116.
- ^ Rodwell 2013, p. 25.
- ^ Wyntoun 1907, p. 395.
- ^ Maxwell 1913, pp. 274–275.
- ^ Sumption 1990, p. 12.
- ^ McKisack 1991, p. 117.
- ^ Nicholson 1961, pp. 20–21.
- ^ a b Rogers 2010, p. 144.
- ^ Mackay 2009, p. 111.
- ^ Ormrod 2012, p. 161.
- ^ Rogers 2014, pp. 69, 76.
- ^ Prestwich 1988, p. 469.
- ^ a b Rogers 2014, p. 61.
- ^ a b Nicholson 1961, pp. 22–23.
- ^ Forster 1907, p. 97.
- ^ Pettifer 2002, p. 176.
- ^ Blackenstall 2010, p. 11.
- ^ Nicholson 1961, p. 23.
- ^ Nicholson 1961, p. 21.
- ^ Nicholson 1961, p. 22.
- ^ Maxwell 1913, pp. 278–279.
- ^ a b Ormrod 2008.
- ^ a b c d e f g h i j k l m Sumption 1990, p. 130.
- ^ a b Nicholson 1961, p. 26.
- ^ a b Nicholson 1961, p. 24.
- ^ a b Corfis & Wolfe 1999, p. 267.
- ^ a b DeVries 1998, p. 121, n. 61.
- ^ a b Rogers 2014, p. 69.
- ^ a b Nicholson 1961, pp. 23–24.
- ^ a b Nicholson 1961, p. 29.
- ^ a b Hall 1999, p. 267.
- ^ Brie 1960, p. 281.
- ^ a b Nicholson 1961, p. 28.
- ^ Dalrymple 1819, pp. 374–375.
- ^ a b Nicholson 1961, p. 29, n. 2.
- ^ a b c Nicholson 1961, p. 30.
- ^ Rogers 2014, p. 66.
- ^ a b c Nicholson 1961, p. 31.
- ^ a b c d Nicholson 1961, pp. 32–33.
- ^ Prestwich 2003, p. 51.
- ^ DeVries 1998, p. 114.
- ^ DeVries 1998, p. 122.
- ^ a b Rogers 2014, p. 70.
- ^ a b c Rogers 2014, p. 68.
- ^ Oman 1998, p. 106.
- ^ a b Nicholson 1961, p. 36.
- ^ a b c d e f Rogers 2014, p. 71.
- ^ a b DeVries 1998, pp. 121–124.
- ^ Deacon 2017, p. 35.
- ^ DeVries 1998, p. 124, n. 75.
- ^ DeVries 1998, p. 121.
- ^ DeVries 1998, p. 124.
- ^ a b c Nicholson 1961, p. 39.
- ^ Maxwell 1913, p. 279.
- ^ Rogers 2014, p. 72.
- ^ a b Rogers 2014, pp. 72–73.
- ^ Rogers 2014, pp. 68, 71–72.
- ^ DeVries 1998, pp. 124–125.
- ^ a b Nicholson 1961, p. 41.
- ^ a b Rogers 2014, p. 73.
- ^ King 2002, p. 281.
- ^ Tuck 2002, p. 148.
- ^ DeVries 1998, p. 125.
- ^ Rogers 2014, pp. 73–74, p.73 n. 168.
- ^ Strickland & Hardy 2011, p. 188.
- ^ Nicholson 1961, p. 42.
- ^ Sumption 1990, p. 131.
- ^ DeVries 1998, p. 126.
- ^ Sadler 2006, p. 195.
- ^ a b Nicholson 1974, p. 129.
- ^ Rogers 2014, p. 74.
- ^ Rogers 2014, p. 77.
- ^ Burne 1999, pp. 141, 184, 208.
- ^ a b Penman 2004, pp. 157–180.
- ^ Sumption 1990, pp. 552–553.
- ^ Maxwell 1913, p. 341.
- ^ Rogers 2014, p. 340.
- ^ Given-Wilson & Bériac 2001, p. 809.
- ^ Site of the Battle 2019.
- ^ Monument 2016.
Sources edit
- Barrow, Geoffrey Wallis Steuart (1965). Robert Bruce and the Community of the Realm of Scotland. London: Eyre and Spottiswoode. OCLC 655056131.
- Blackenstall, Stan (2010). Coastal Castles of Northumberland. Stroud: Amberley. ISBN 978-1-44560-196-0.
- Brie, Friedrich (1960). The Brut; or, The Chronicles of England. Early English Text Society (repr. ed.). Oxford: Oxford University Press. OCLC 15591643.
- Burne, Alfred (1999) [1955]. The Crecy War. Ware, Hertfordshire: Wordsworth Editions. ISBN 978-1-84022-210-4.
- Corfis, Ivy; Wolfe, Michael (1999). The Medieval City Under Siege. Woodbridge, Suffolk; Rochester, NY: Boydell Press. ISBN 978-0-85115-756-6.
- Dalrymple, Sir David (1819). Annals of Scotland: From the Accession of Malcolm III. in the Year M.LVII. to the Accession of the House of Stewart in the Year M.CCC.LXXI. To which are Added, Tracts Relative to the History & Antiquities of Scotland. Vol. 2. Edinburgh: A. Constable & Co. OCLC 150903449.
- Deacon, Jacob Henry (2017). "Single Combat During the Hundred Year's War: When it wasn't a Game". Medieval Warfare. 7 (3): 35–39. JSTOR 48578061.
- DeVries, Kelly (1998). Infantry Warfare in the Early Fourteenth Century : Discipline, Tactics, and Technology. Woodbridge, Suffolk; Rochester, NY: Boydell & Brewer. ISBN 978-0-85115-571-5.
- Forster, Robert Henry (1907). "The Walls of Berwick-upon-Tweed". Journal of the British Archaeological Association. XIII (2): 89–104. doi:10.1080/00681288.1907.11894053. ISSN 0068-1288.
- Given-Wilson, Chris; Bériac, Françoise (September 2001). "Edward III's Prisoners of War: The Battle of Poitiers and its Context". The English Historical Review. 116 (468): 802–833. doi:10.1093/ehr/CXVI.468.802. ISSN 0013-8266.
- Hall, Bert (1999). "Technology and Tactics". In Corfis, Ivy; Wolfe, Michael (eds.). The Medieval City Under Siege. Medieval Archaeology Series. Woodbridge, Suffolk: Boydell and Brewer. pp. 257–276. ISBN 978-0-85115-756-6.
- King, Andy (2002). "According to the Custom Used in French and Scottish Wars: Prisoners and Casualties on the Scottish Marches in the Fourteenth Century". Journal of Medieval History. XXVIII (3): 263–290. doi:10.1016/S0048-721X(02)00057-X. ISSN 0304-4181. S2CID 159873083.
- Mackay, James (2009). William Wallace: Brave Heart. Edinburgh; London: Mainstream Publishing. ISBN 978-1-85158-823-7.
- The Chronicle of Lanercost, 1272–1346. Translated by Maxwell, Herbert. Glasgow: J. Maclehose. 1913. OCLC 27639133.
- McKisack, May (1991). The Fourteenth Century (repr. ed.). Oxford: Oxford University Press. ISBN 978-0-19285-250-2.
- "Battle of Halidon Hill, 1333". War Memorials Online. 2016. Retrieved 13 August 2021.
- Nicholson, Ranald (1961). "The Siege of Berwick, 1333". The Scottish Historical Review. XXXX (129): 19–42. JSTOR 25526630. OCLC 664601468.
- Nicholson, Ranald (1974). Scotland: The Later Middle Ages. University of Edinburgh History of Scotland. Edinburgh: Oliver and Boyd. ISBN 978-0-05002-038-8.
- Oman, Charles (1998) [1924]. A History of the Art of War in the Middle Ages: 1278–1485 A.D. London: Greenhill Books. ISBN 978-1-85367-332-0.
- Ormrod, Mark (2008). "War in Scotland, 1332–1336". Oxford Dictionary of National Biography (online ed.). Oxford University Press. doi:10.1093/ref:odnb/8519. Retrieved 6 December 2018. (Subscription or UK public library membership required.)
- Ormrod, Mark (2012). Edward III. Yale Medieval Monarchs series. New Haven: Yale University Press. ISBN 978-0-300-11910-7.
- Penman, Michael (2004). David II. East Linton, East Lothian: Tuckwell Press. ISBN 978-1-86232-202-8.
- Pettifer, Adrian (2002). English Castles: A Guide by Counties. Woodbridge, Suffolk: Boydell and Brewer. ISBN 978-0-85115-782-5.
- Prestwich, Michael (1988). Edward I. Yale Medieval Monarchs series. Berkeley: University of California Press. ISBN 978-0-52006-266-5.
- Prestwich, Michael (2003). The Three Edwards: War and State in England, 1272–1377 (2nd ed.). London; New York: Routledge. ISBN 978-0-415-30309-5.
- Rodwell, Warwick (2013). The Coronation Chair and Stone of Scone: History, Archaeology and Conservation. Oxford: Oxbow Books. ISBN 978-1-78297-153-5.
- Rogers, Clifford (2010). The Oxford Encyclopedia of Medieval Warfare and Military Technology. Vol. I. Oxford: Oxford University Press. ISBN 978-0-19533-403-6.
- Rogers, Clifford (2014) [2000]. War Cruel and Sharp: English Strategy under Edward III, 1327–1360. Woodbridge, Suffolk: Boydell Press. ISBN 978-0-85115-804-4.
- Sadler, John (2006), Border Fury: England and Scotland at War 1296–1568, Harlow, Essex: Longman, ISBN 978-1-4058-4022-4
- "The Site of The Battle of Halidon Hill 1333". Historic England. 2019. Retrieved 12 August 2021.
- Strickland, Matthew; Hardy, Robert (2011). The Great Warbow: From Hastings to the Mary Rose. Somerset: J. H. Haynes & Co. ISBN 978-0-85733-090-1.
- Sumption, Jonathan (1990). Trial by Battle. The Hundred Years' War. Vol. I. London: Faber and Faber. ISBN 978-0-57120-095-5.
- Tuck, Anthony (2002). "A Medieval Tax Haven: Berwick upon Tweed and the English Crown, 1333–1461". In Britnel, Richard; Hatcher, John (eds.). Progress and Problems in Medieval England: Essays in Honour of Edward Miller. Cambridge: Cambridge University Press. pp. 148–167. ISBN 978-0-52152-273-1.
- Weir, Alison (2006). Queen Isabella: Treachery, Adultery, and Murder in Medieval England. New York: Random House. ISBN 978-0-34545-320-4.
- Wyntoun, Andrew (1907). Amours, François Joseph (ed.). The Original Chronicle of Scotland. Vol. II. Edinburgh: Blackwood. OCLC 61938371.