


Summary
| Battle of Mont Sorrel | |||||||
|---|---|---|---|---|---|---|---|
| Part of the Ypres Salient along the Western Front of World War I | |||||||
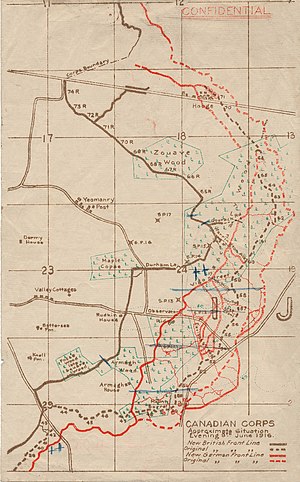 Restored battlefield map of positions occupied on 4 June 1916 | |||||||
| |||||||
| Belligerents | |||||||
| Commanders and leaders | |||||||
|
|
| ||||||
| Strength | |||||||
|
2 Canadian divisions 1 British division | 3 divisions | ||||||
| Casualties and losses | |||||||
| 8,430 | 5,765[1] | ||||||
The Battle of Mont Sorrel (Battle of Mount Sorrel, Battle of Hill 62) was a local operation in World War I by three divisions of the German 4th Army and three divisions of the British Second Army in the Ypres Salient, near Ypres in Belgium, from 2 to 13 June 1916.
To divert British resources from the build-up being observed on the Somme, the XIII (Royal Württemberg) Corps and the 117th Infantry Division attacked an arc of high ground defended by the Canadian Corps in Flanders. The German forces captured the heights at Mount Sorrel and Tor Top, before entrenching on the far slope of the ridge.
Following a number of attacks and counterattacks, two divisions of the Canadian Corps, supported by the 20th Light Division and Second Army siege and howitzer battery groups, recaptured the majority of their former positions.
Background edit
Mount Sorrel edit
Located in the Ypres Salient, 3 km (1.9 mi) east of Ypres, Belgium and 1,100 m (1,200 yd) from Hill 60, the Battle of Mount Sorrel took place along a ridge between Hooge and Zwarteleen. The crest of Mount Sorrel, nearby Tor Top (Hill 62) and Hill 61 rose approximately 30 m (98 ft) higher than the low ground at Zillebeke, affording the occupying force excellent observation over the salient, the town of Ypres and approach routes.[2] The peaks were the only portion of the crest of the Ypres ridge which remained in Allied hands.[3]
Somme offensive edit
In northern France, men and resources were being marshalled in preparation for the large British–French Somme Offensive. The build-up in the Somme did not go unnoticed by the Oberste Heeresleitung, the German Supreme Army Command. The German 2nd Army, which was holding the sector north of the Somme, had observed preparations for an offensive since the end of February 1916.[4] Short of resources due to the Battle of Verdun, the Germans could only mount local operations to divert British resources from the Somme.[5]
Canadian Corps edit
On 28 May 1916, in an abrupt change of command, Lieutenant-General Edwin Alderson was appointed to the largely ceremonial post of Inspector General of Canadian Forces in England and was succeeded by Lieutenant-General Julian Byng as commander of the Canadian Corps.[6]
Prelude edit
German preparations edit
On 20 May 1916, the commander of the XIII (Württemberg) Corps, General Theodor von Watter, issued orders that the corps was to "wrest from the enemy his last dominating observation posts over considerable areas immediately behind the chief fighting ground". There was discussion over whether the ground between Mont Sorrel and Tor Top was tenable and the commander of the 27th Division, Major-General Franz Friedrich Graf von Pfeil und Klein Ellguth, predicted that it could not, noting the result of the Actions of the Bluff (14–15 February, 2 March 1916).[7][a] Watter held that the circumstances were different, a new line being safe from envelopment on both flanks, was distant from the main concentration of British and Canadian heavy artillery and was not easily observed or endangered from the flank by Mont Kemmel. No extra troops were provided for the attack, the preparations for which took six weeks. Great care was taken to keep the preparations secret, the troops being told that they were going to be transferred and must strengthen the defences before they left. Saps were slowly extended forward then linked laterally, creating a jumping-off position with an unusual amount of dug-outs.[8]
The corps artillery was reinforced by guns from the XXIII Reserve Corps and the XXVI Reserve Corps on the flanks and from Marinekorps Flandern on the coast and many light, medium and heavy trench mortars were assembled. On 1 June the troops were told of the real reason for the preparations and were also notified of a great naval victory in the North Sea (the Battle of Jutland). The troops moved up on the night of 1/2 June and crowded into the trenches and dug-outs, undiscovered, during the morning. From north to south were two battalions of Infantry Regiment 121 (IR121) and two from IR 125 of the 26th Division and a battalion of IR 120 of the 27th Division. Grenadier Regiment 119 (GR119) and IR 127 of the division were in reserve; Reserve Regiment 11 (RR11) of the 117th Division was loaned to cover the southern flank of the XIII (Württemberg) Corps. On the northern flank, the 117th Division was to use its remaining two regiment was to stage a diversion and capture Hooge if possible. The scope of the attack was limited to the capture of the Iron Line (first objective) and then the Golden Line (second objective), an advance of about 460 m (500 yd).[9]
Canadian preparations edit

Byng inspected the Canadian Corps defences and noted that they were overlooked by German positions and under constant danger of German fire.[10] Byng ordered Major-General Malcolm Mercer, the commander of the 3rd Canadian Division, to plan a local attack for the capture of the more dangerous German positions.[11] In mid-May, aerial reconnaissance near Mont Sorrel indicated that German forces were preparing an attack. Royal Flying Corps (RFC) observers had noted the existence of works curiously resembling the Canadian positions well behind the German lines. The Germans were also observed sapping forward, which implied an attack.[2]
German attack edit
2 June edit
On the morning of 2 June, the XIII (Württemberg) Corps began a heavy artillery bombardment against the Canadian positions. Nine-tenths of the Canadian forward reconnaissance battalion became casualties during the bombardment.[12] Mercer and the 8th Canadian Brigade commander, Brigadier-General Victor Williams, had been conducting an inspection of the front line when the shelling began.[2] Mercer was wounded three times and died early on 3 June; Williams was wounded in the face and head and taken prisoner.[12] At 1:00 pm, German pioneers detonated four mines near the Canadian forward trenches and six infantry battalions attacked, with five more battalions in support and six in reserve.[13]
When the German forces attacked, mainly against positions held by the 8th Canadian Brigade, resistance at the front lines was "minimal".[14] For several critical hours the 3rd Canadian Division and the 8th Canadian Brigade were leaderless and their level of defence suffered accordingly. Brigadier-General Edward Hoare-Nairne of the 3rd (Lahore) Division divisional artillery, eventually assumed temporary command of the 3rd Canadian Division.[2] German forces were still able to capture Mont Sorrel and Hill 61. After advancing up to 1,100 m (1,200 yd), the XIII Corps troops dug in.[15][16] Although the road to Ypres was open, no German officer took the initiative to exceed instructions and capitalize on the success experienced by the German forces.[2]
Counter-attack, 3 June edit
Byng hastily organized a counterattack in the early hours of 3 June. Owing to the casualties in the 3rd Canadian Division, two brigades of the 1st Canadian Division were temporarily placed under the command of Hoare-Nairne, the temporary commander of 3rd Canadian Division.[17][18] The counterattack was scheduled for 2:00 am on 3 June 1916.[17] Due to the distances that had to be covered by incoming units, the difficulties in communications and ever present German artillery-fire, the time allowed for assembly proved inadequate and the attack was postponed until 7:00 am.[19] The signal to attack was to be six simultaneous green rockets. Some rockets misfired and did not burst, leading to an unsynchronised attack.[12] The four attacking battalions suffered many casualties as they advanced over open ground in broad daylight.[19] The attackers failed to regain any lost territory but closed a 550 m (600 yd) gap in the line and advance the Canadian front about 910 m (1,000 yd) from the positions it had retreated to after the German assault.[19]
Canadian attack edit
Canadian preparations, 4–8 June edit
The commander of the British Expeditionary Force, General Douglas Haig, and the Second Army commander, General Herbert Plumer, believed it necessary to expel the Germans from the captured positions.[19] In view of the preparations for the Somme offensive, Haig did not wish to divert more forces than were necessary and support was limited to a number of additional artillery units and an infantry brigade from the 20th (Light) Division.[18][b] It was suggested that the next counter-attack be carried out with the infantry available, with an emphasis on the use of large amounts of artillery.[21]
The additional artillery units immediately went to work hampering German consolidation by shelling their front and support lines and seeking out hostile batteries.[21] The Germans sprung a surprise on the Canadians by exploding four large mines under trenches of the 2nd Canadian Division covering the spur at the eastern outskirts of the ruins of Hooge. A company of the Canadian 28th (North West) Battalion was annihilated in the explosions.[22] The Canadians managed to hold their position and prevent the Germans from reaching their support line but Byng decided to leave the Hooge trenches in German hands and to concentrate on regaining Mount Sorrel and Tor Top.[23] To dissuade the Germans from more attacks on the left flank of the Canadian Corps, the dismounted British 2nd Cavalry Brigade came on loan to the Canadian Corps as a counter-attack force.[23]
Attack, 9–14 June edit

Byng ordered the 1st Canadian Division commander, Major-General Arthur Currie, to organize a methodical attack against the German positions at Mont Sorrel and Tor Top.[24] Due to the casualties suffered during the failed counterattack of 3 June, Currie regrouped his stronger battalions into two composite brigades.[23] Four intense bombardments of thirty minutes each were carried out between 9 and 12 June to deceive the Germans into expecting immediate attacks, which did not transpire.[23] For ten hours on 12 June all the German positions between Hill 60 and Sanctuary Wood were bombarded .[23] Particular attention was given to the Canadian Corps flanks, from which enfilade machine-gun fire might be expected.[23]
The following morning, the Germans were subjected to an additional 45 minutes of heavy artillery bombardment before the Canadians advanced behind a smoke screen.[23][24] The Germans are believed to have been taken largely by surprise as they offered little resistance and the Canadians were able to take approximately 200 prisoners.[23] With the exception of the trenches at Hooge, the Germans fell back to their original lines and in a little over an hour the assault was over.[22] On 14 June, the Germans launched two counterattacks which were repulsed, after which they advanced their trench to within 150 m (490 ft) of the Canadians but made no further assaults.[23][24]
Aftermath edit
Subsequent operations edit
The Canadian Corps remained in the Ypres Salient conducting an active defense until the beginning of September, when the corps was transferred to the Somme.[25] In the aftermath of the battle and in the wake of the death of Mercer, the Canadian Corps commander, Julian Byng, was forced to address the politically sensitive topic of appointing a new 3rd Canadian Division commander.[26] Sam Hughes, the Canadian Minister of Militia and Defence, telegraphed Byng and insisted that his son, 1st Canadian Brigade commander, Brigadier-General Garnet Hughes, be given command.[24] To the fury of the minister, Byng instead promoted the 2nd Canadian Brigade commander, Brigadier-General Louis Lipsett, a highly regarded pre-war British regular, to the post.[27] The minister protested and confronted Byng in August 1916 but he did not relent, insisting that "he had nothing against Garnet Hughes there was simply a better man for the post".[24] The change in command between Lieutenant-General Edwin Alderson and Julian Byng was used to make more changes.[28] Much to the displeasure of Hughes and the delight of the Canadian troops, the unreliable Canadian Ross Rifle began to be replaced with the British Lee–Enfield and the Colt machine gun with the Vickers and Lewis machine guns.[24]
Casualties edit
The 26th (Württemberg) Division suffered 3,436 casualties, the 27th (Württemberg) Division, with Reserve Regiment 11, 1,389 casualties and the 117th Division suffered 940 casualties a total of 5,765. From 2 to 14 June, the Canadian Corps suffered 8,430 casualties.[29]
Commemoration edit
- The Canadian Corps participation in the Battle of Mount Sorrel is commemorated with the Hill 62 (Sanctuary Wood) Memorial.[30]
- In 2011, a special memorial to the 15th Battalion was also installed on 'Observatory Ridge' to commemorate where the unit fought during the battle. It is found 15 m (49 ft) west of the junction of Schachteweidestraat and Zandvoordestraat on the south side of the road at:50°49′58.2″N 02°56′19.3″E / 50.832833°N 2.938694°E.[31]
- The nearby Sanctuary Wood Museum Hill 62 contains a preserved/simulated section of front line trenches occupied by the British and Canadians between 1916 and 1917.[32]
- Allied soldiers killed during the battle are buried in the nearby Sanctuary Wood Cemetery, Hooge Crater Cemetery, Maple Copse Cemetery and Lijssenthoek Military Cemetery.[33]
- Those killed during the battle with no known resting place are commemorated on the Menin Gate in Ypres, Belgium.[34]
- The Royal Regiment of Canada conducts a Sorrel Day parade, open to the public, at the Fort York Armoury every year on the second Sunday in June.[citation needed]
Notes edit
Footnotes edit
- ^ Godefroy 2009, p. 175.
- ^ a b c d e Nicholson 1964, p. 148.
- ^ Nicholson 1964, p. 147.
- ^ Nicholson 1964, p. 162.
- ^ Nicholson 1964, p. 198.
- ^ Nicholson 1964, p. 146.
- ^ a b Edmonds 1993, p. 243.
- ^ Edmonds 1993, pp. 243–244.
- ^ Edmonds 1993, p. 244.
- ^ Davies 1997, pp. 94–96.
- ^ Godefroy 2009, p. 177.
- ^ a b c Granatstein 2004a, p. 81.
- ^ Nicholson 1964, pp. 148–149.
- ^ Godefroy 2009, p. 188.
- ^ Baker 1996.
- ^ Zuehlke & Daniels 2001, p. 125.
- ^ a b Nicholson 1964, p. 150.
- ^ a b Godefroy 2009, p. 190.
- ^ a b c d Nicholson 1964, p. 151.
- ^ Edmonds 1993, p. 238.
- ^ a b Nicholson 1964, p. 152.
- ^ a b Granatstein 2004a, p. 84.
- ^ a b c d e f g h i Nicholson 1964, p. 153.
- ^ a b c d e f Granatstein 2004b, p. 92.
- ^ Nicholson 1964, p. 154.
- ^ Mcculloch 1998, p. 55.
- ^ Mcculloch 1998, p. 56.
- ^ Granatstein 2004a, pp. 85–86.
- ^ Edmonds 1993, pp. 245, 242.
- ^ Holt & Holt 2014, pp. 96–98, 114.
- ^ Holt & Holt 2014, pp. 96–97.
- ^ Doyle 2000, p. 390.
- ^ Holt & Holt 2014, pp. 94–95.
- ^ Holt & Holt 2014, pp. 27–32.
References edit
- Baker, Chris (1996). "The Battle of Mount Sorrel". The Long, Long Trail. Retrieved 14 November 2014.
- Holt, Tonie; Holt, Valmai (2014) [1996]. Major and Mrs Holt's Battlefield Guide to Ypres Salient and Passchendaele (7th ed.). Barnsley: Pen & Sword Military. ISBN 978-0-85052-551-9.
- Davies, Frank (1997). Bloody Red Tabs: General Officer Casualties of the Great War 1914–1918. London: Pen & Sword Books. ISBN 978-0-85052-463-5.
- Edmonds, J. E. (1993) [1932]. Military Operations France and Belgium, 1916: Sir Douglas Haig's Command to the 1st July: Battle of the Somme. History of the Great War Based on Official Documents by Direction of the Historical Section of the Committee of Imperial Defence. Vol. I (Imperial War Museum & Battery Press ed.). London: Macmillan. ISBN 978-0-89839-185-5.
- English, Allan Douglas, ed. (1998). The Changing Face of War: Learning from History. Montreal: McGill-Queen's Press. ISBN 978-0-7735-1723-3.
- Mcculloch, Ian. "A Study in Operational Command: Byng and the Canadian Corps". In English (1998), pp. 55–66.
- Granatstein, Jack Lawrence (2004a). Hell's Corner: An Illustrated History of Canada's Great War, 1914–1918. Toronto: Douglas & McIntyre. ISBN 978-1-55365-047-8 – via Archive Foundation.
- Granatstein, Jack Lawrence (2004b). Canada's Army: Waging War and Keeping the Peace. Toronto: University of Toronto Press. ISBN 978-0-8020-8696-9.
- Horn, Bernd, ed. (2009). Fortune Favours the Brave: Tales of Courage and Tenacity in Canadian Military History. Toronto: Dundurn Press. ISBN 978-1-55002-841-6.
- Godefroy, Andrew. "A Clash of Wills: The Canadian Struggle for Mount Sorrel, 2 June 1916". In Horn (2009), pp. 175–200.
- Nicholson, G. W. L. (1964) [1962]. Canadian Expeditionary Force 1914–1919 (PDF). Official History of the Canadian Army in the First World War (2nd corr. online scan ed.). Ottawa: Queen's Printer and Controller of Stationery. OCLC 557523890. Retrieved 17 June 2023.
- Rose, P. F.; Nathaniel, C. Paul, eds. (2000). Geology and Warfare: Examples of the Influence of Terrain and Geologists on Military Operations. London: Geological Society. ISBN 978-1-86239-065-2.
- Doyle, P. "A Field Guide to the Geology of the British Sector of the Western Front, 1914–1918". In Rose & Nathaniel (2000).
- Zuehlke, Mark; Daniels, C. Stewart (2001). Canadian Military Atlas. Toronto: Stoddart. ISBN 978-0-7737-3289-6.
External links edit
- Battle of Mount Sorrel
- The actions of Spring 1916