


Summary
HMAS Armidale (J240), named for the then town of Armidale, New South Wales, was one of 60 Bathurst-class corvettes constructed during World War II, and one of 36 initially manned and commissioned solely by the Royal Australian Navy (RAN).[3]
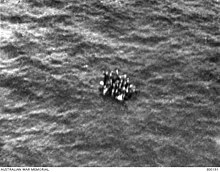
 HMAS Armidale in Port Moresby Harbour, September 1942
| |
| History | |
|---|---|
| Namesake | City of Armidale, New South Wales |
| Builder | Morts Dock & Engineering Co in Sydney |
| Laid down | 1 September 1941 |
| Launched | Floated 24 January 1942 |
| Commissioned | 11 June 1942 |
| Motto | "Stand Firm" |
| Honours and awards |
|
| Fate | Sunk by Japanese aircraft, 1 December 1942 |
| Badge |  |
| General characteristics | |
| Class and type | Bathurst-class corvette |
| Displacement | 650 long tons (660 t) (standard), 1,025 long tons (1,041 t) (full war load) |
| Length | 186 ft (57 m) |
| Beam | 31 ft (9.4 m) |
| Draught | 8 ft 6 in (2.59 m) |
| Propulsion |
|
| Speed | 15 knots (28 km/h; 17 mph) at 1,750 horsepower (1,300 kW) |
| Complement | 85 |
| Armament |
|
Launched in early 1942, and initially assigned to convoy escort duties, Armidale was transferred to Darwin in October 1942. The corvette was attacked and sunk off Betano Bay (9°9′52″S 125°43′30″E / 9.16444°S 125.72500°E), on the south coast of Portuguese Timor, (now East Timor) by 13 Japanese aircraft on 1 December 1942, while attempting to evacuate Australian and Dutch soldiers and deliver a relief contingent. She was the only Bathurst-class corvette to be lost to enemy action.[4]
Design and construction edit
In 1938, the Australian Commonwealth Naval Board (ACNB) identified the need for a general purpose 'local defence vessel' capable of both anti-submarine and mine-warfare duties, while easy to construct and operate.[5][6] The vessel was initially envisaged as having a displacement of approximately 500 tons, a speed of at least 10 knots (19 km/h; 12 mph), and a range of 2,000 nautical miles (3,700 km; 2,300 mi)[7] The opportunity to build a prototype in the place of a cancelled Bar-class boom defence vessel saw the proposed design increased to a 680-ton vessel, with a 15.5 knots (28.7 km/h; 17.8 mph) top speed, and a range of 2,850 nautical miles (5,280 km; 3,280 mi), armed with a 4-inch gun, equipped with asdic, and able to be fitted with either depth charges or minesweeping equipment depending on the planned operations: although closer in size to a sloop than a local defence vessel, the resulting increased capabilities were accepted due to advantages over British-designed mine warfare and anti-submarine vessels.[5][8] Construction of the prototype HMAS Kangaroo did not go ahead, but the plans were retained.[9] The need for locally built 'all-rounder' vessels at the start of World War II saw the "Australian Minesweepers" (designated as such to hide their anti-submarine capability, but popularly referred to as "corvettes") approved in September 1939, with 60 constructed during the course of the war: 36 (including Armidale) ordered by the RAN, 20 ordered by the British Admiralty but manned and commissioned as RAN vessels, and 4 for the Royal Indian Navy.[5][10][11][12][3]
Armidale was laid down by Morts Dock & Engineering Co in Sydney on 1 September 1941.[3] As the ship was built in a dock, she was floated on 24 January 1942,[3] with the ceremony officiated by Reverend A. G. Rix.[13] Armidale was commissioned on 11 June 1942.[3]
Operational history edit
Following commissioning, Armidale's primary role was the escort of convoys along the Australian coast and from Australia to New Guinea.[3] In October 1942, Armidale was reassigned to the 24th Minesweeping Flotilla, operating out of Darwin.[3]
Betano Bay edit
In late November 1942, the RAN was called on to evacuate the commandos of the 2/2nd Independent Company (an evacuation attempt in September failed when the destroyer HMAS Voyager grounded, then was destroyed by Japanese aircraft), a contingent of Dutch troops, and over 100 Portuguese civilians, while delivering a relief contingent of Royal Netherlands East Indies Army and Australian soldiers.[3][14] Armidale, sister ship Castlemaine, and the auxiliary patrol boat Kuru were assigned to the operation by Commodore Cuthbert Pope, Naval Officer in Charge Darwin, with Castlemaine the commanding ship.[14] The plan was for Kuru to reach Betano Bay early on the night of 30 November, offload supplies, and take on the civilians.[14] The two corvettes were to arrive two hours later; Kuru would deliver her passengers to Castlemaine, which was to head for Darwin at first opportunity, then shuttle relief troops aboard Armidale to shore while evacuating the soldiers.[14]
The corvettes sailed from Darwin at midday on 29 November, leaving just as Japanese aircraft flew over the harbour.[14] At 09:00 on 30 November, the two ships were located by a Japanese reconnaissance plane, but were unable to shoot it down.[14] Because of the likelihood of attack during the day and the distance from the destination, the ships radioed Darwin and suggested that the mission be aborted, but Pope instructed they were to continue after steering away from their intended destination for an hour, and promised fighter support.[14] Armidale and Castlemaine were attacked at midday by 14 Japanese bombers, but these were driven off by a force of Bristol Beaufighters, which then returned to Australia.[14] Another attack came at 14:00, but neither side was able to do damage.[3][14] Delays from the evasive course and two air attacks meant the corvettes reached Betano Bay after 02:30 on 1 December, with no sign of Kuru, and retreated to sea.[14] Kuru was sighted at daybreak – assuming the corvettes were not coming, her commander chose to sail for Darwin with the civilians – and the civilians were transferred to Castlemaine.[14] Although as senior ship, Castlemaine's commanding officer felt he should return to Betano Bay with the soldiers, the troops were aboard the other corvette, and at 11:00 he ordered (with Commodore Pope's approval) Armidale and Kuru to return by separate routes and attempt the operation again that night.[14]
Loss edit
At 13:00, five approaching Japanese dive-bombers were sighted by Armidale.[14] Two aircraft were damaged by the corvette's guns, while the other three missed while attempting to evade fire.[14] A second air attack occurred at 14:00; five Zero fighters distracted the corvette's weapons while nine torpedo bombers made attack runs.[14] At one point, a late-released torpedo passed over the bridge before hitting the water.[14] At 15:10, the ship was hit in the port side by two torpedoes in quick succession: the first into the mess deck, killing many of the soldiers there, the second into the engine room.[14]
As the soldiers and sailors began to evacuate into the water, the Zeroes stopped attacking the sinking corvette and began strafing runs on those in the water.[14] Ordinary Seaman Edward "Teddy" Sheean, who had been wounded in the initial attack, strapped himself into one of Armidale's 20 mm Oerlikons and opened fire on the aircraft.[14][15] Sheean forced one Zero to crash into the sea and damaged at least two others; continuing to fire until he went down with Armidale.[14] In 2020, he was posthumously awarded the Victoria Cross for Australia for his actions.[16] Low on fuel, the Japanese aircraft headed for home.[14] The survivors found that the ship’s two boats survived the sinking, and were able to fashion a raft from debris.[14]
The survivors remained together until midday on 2 December, when one of the boats, with the commanding officer aboard, set out for Darwin in an effort to find rescuers.[14] At 10:15 on 5 December, they were spotted by a reconnaissance aircraft, and the 22 aboard were rescued by Kalgoorlie.[14] On learning that more men were still at sea, an air search was organised, and the auxiliary patrol boat Vigilant was to stand by off Melville Island.[14] That same day, the other boat, with 29 aboard, headed for Darwin, leaving the raft, with 49 aboard, behind.[14] At 16:00 on 8 December, a PBY Catalina flying boat sighted the raft, now with about 20 aboard, and the second boat.[14] The aircraft was unable to land to assist either group of survivors because of rough seas, but directed Kalgoorlie to the boat.[14] However, the raft could not be located again, and the search effort was called off on 13 December.[14] 40 personnel from Armidale and 60 embarked men of the Royal Netherlands East Indies Army were killed.[3]
Aftermath edit
Following this attack, the Royal Australian Navy changed policy to prevent minimally armed vessels like the Bathurst-class corvettes travelling into areas of heavy enemy presence while attempting to perform tasks similar to Armidale.[17]
Memorial edit
A memorial plaque is dedicated to HMAS Armidale and her Tasmanian RAN personnel at the Tasmanian Seafarers' Memorial at Triabunna on the east coast of Tasmania.[18]
The plaque contains the following text:
HMAS Armidale
1.12.1942 corvette torpedoed en route
to Betano with Dutch native troops
to reinforce Timor guerilla forces
98 of 149 servicemen died as a result.
Tasmanian RANR casualties were ~
Sheean, Edward (Teddy) OS H1617 KIA
Piesse, Edward Stanfield OS W1824 MPD
Quigley, Maxwell T. A/AB H1552 MPD
Turner, Albert B. OS H18335 MPD[19]
Citations edit
- ^ "Navy Marks 109th Birthday With Historic Changes To Battle Honours". Royal Australian Navy. 1 March 2010. Archived from the original on 13 June 2011. Retrieved 14 March 2010.
- ^ "Royal Australian Navy Ship/Unit Battle Honours" (PDF). Royal Australian Navy. 1 March 2010. Archived from the original (PDF) on 14 June 2011. Retrieved 14 March 2010.
- ^ a b c d e f g h i j Royal Australian Navy, HMAS Armidale (I)
- ^ David Stevens et al., 2001, The Royal Australian Navy, opposite p. 112
- ^ a b c Stevens, The Australian Corvettes, p. 1
- ^ Stevens, A Critical Vulnerability, p. 103
- ^ Stevens, A Critical Vulnerability, pp. 103–4
- ^ Stevens, A Critical Vulnerability, pp. 103–5
- ^ Stevens, A Critical Vulnerability, p. 104
- ^ Stevens, A Critical Vulnerability, pp. 105, 148
- ^ Donohue, From Empire Defence to the Long Haul, p. 29
- ^ Stevens et al., The Royal Australian Navy, p. 108
- ^ "Australian War Memorial – 012824". Collection database. Australian War Memorial. Archived from the original on 26 August 2012. Retrieved 28 February 2010.
- ^ a b c d e f g h i j k l m n o p q r s t u v w x y z aa ab ac Feuer, Heroic stand of HMAS Armidale, p.50
- ^ Straczek, Ordinary Seaman Edward Sheean
- ^ "Queen approves Victoria Cross for WWII hero Teddy Sheean". ABC News. 13 August 2020. Retrieved 15 August 2020.
- ^ Walker, HMAS Armidale, p.[page needed]
- ^ "HMAS Armidale (1942)". seafarersmemorial.org.au. Tasmanian Seafarers' Memorial. Retrieved 27 February 2017.
- ^ "HMAS Armidale" (Memorial plaque). Triabunna, Tasmania: Tasmanian Seafarers' Memorial.
References edit
- Books
- Donohue, Hector (October 1996). From Empire Defence to the Long Haul: post-war defence policy and its impact on naval force structure planning 1945–1955. Papers in Australian Maritime Affairs. Vol. 1. Canberra: Sea Power Centre. ISBN 0-642-25907-0. ISSN 1327-5658. OCLC 36817771.
- Stevens, David (2005). A Critical Vulnerability: the impact of the submarine threat on Australia's maritime defense 1915–1954. Papers in Australian Maritime Affairs. Vol. 15. Canberra: Sea Power Centre Australia. ISBN 0-642-29625-1. ISSN 1327-5658. OCLC 62548623.
- Stevens, David; Sears, Jason; Goldrick, James; Cooper, Alastair; Jones, Peter; Spurling, Kathryn (2001). Stevens, David (ed.). The Royal Australian Navy. The Australian Centenary History of Defence (vol III). South Melbourne, VIC: Oxford University Press. ISBN 0-19-554116-2. OCLC 50418095.
- Walker, Frank (1990). HMAS Armidale: the ship that had to die. Budgewoi, NSW: Kingfisher Press. ISBN 0-646-00541-3. OCLC 23082116.
- Journal and news articles
- Feuer, A.B. (February 1999). "Heroic stand of HMAS Armidale". World War II. 13 (6): 50–57. ISSN 0898-4204.
- Stevens, David (May 2010). "The Australian Corvettes" (PDF). Hindsight (Semaphore). 2010 (5). Sea Power Centre – Australia. Archived from the original (PDF) on 20 March 2011. Retrieved 13 August 2010.
- Websites
- "HMAS Armidale (I)". HMA Ship Histories. Sea Power Centre – Royal Australian Navy. Retrieved 5 October 2012.
- Straczek, J.H. "Ordinary Seaman Edward Sheean". People Histories. Royal Australian Navy. Archived from the original on 13 March 2011. Retrieved 27 September 2010.
Further reading edit
- Walker, Frank (2005). HMAS Armidale lives on. Budgewoi, NSW: Kingfisher Press. OCLC 224636266. – 2nd edition of HMAS Armidale: the ship that had to die, published to coincide with the launch of the patrol boat Armidale (ACPB 83).
- Mandigan, Col (2000). Armidale '42 : a survivor's account. Sydney, NSW: Macmillan. ISBN 0-7329-1039-0. OCLC 222752324. – Book authored by a survivor of the sinking