


Summary
| Operation Ox Head/Unternehmen Ochsenkopf | |||||||
|---|---|---|---|---|---|---|---|
| Part of the Tunisia Campaign of the Second World War | |||||||
 Panzer VI (Tiger I) in Tunisia, 1943 | |||||||
| |||||||
| Belligerents | |||||||
|
|
| ||||||
| Commanders and leaders | |||||||
|
|
| ||||||
| Strength | |||||||
|
|
| ||||||
| Casualties and losses | |||||||
|
4,200 casualties (2,300 prisoners) 16 tanks 31 guns 40 vehicles |
4,500 casualties (2,200 prisoners) 71 tanks 60 vehicles | ||||||
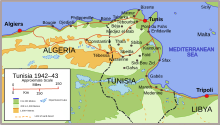
Unternehmen Ochsenkopf (Operation Ox Head) also known as the Battle of Sidi Nsir and the Battle of Hunts Gap was an Axis offensive operation in Tunisia from 26 February to 4 March 1943, during the Tunisia Campaign of the Second World War. The offensive and a subsidiary operation Unternehmen Ausladung was intended to gain control of Medjez el Bab, Béja, El Aroussa, Djebel Abiod and a position known as Hunt's Gap, between the British First Army and the Axis Army Group Africa (Heeresgruppe Afrika/Gruppo d'Armate Africa). The offensive gained some ground, but none of the more ambitious objectives were achieved before the operation was called off due to increasing losses of infantry and tanks, particularly the heavy Tigers. Unternehmen Ochsenkopf was the last big Axis offensive by the 5th Panzer Army before the surrender of the Afrika Korps in May 1943.[1]
Background edit
After the Battle of Kasserine Pass (19–24 February), the Axis created Army Group Africa (Heeresgruppe Afrika/Gruppo d'Armate Africa) as a command headquarters for the 5th Panzer Army and the Italian 1st Army in Tunisia. Adolf Hitler and the German General Staff Oberkommando der Wehrmacht (OKW) believed that Generaloberst Hans-Jürgen von Arnim should assume command but Generalfeldmarschall Albert Kesselring the German Oberbefehlshaber Süd (OB Süd, Commander-in-Chief South) argued for Generalfeldmarschall Erwin Rommel, who was appointed to command the new Army Group Africa on 23 February.[2] Comando Supremo, the Italian General Staff, ordered Rommel to end the attack at Kasserine, in view of the Allied reinforcement of the Tebessa area, to conduct a spoiling offensive against the Eighth Army (General Bernard Montgomery) as it approached the defences of the Mareth Line from the east.[3]
The villages of Gafsa, Metlaoui and Tozeur were to be held by mobile troops and most of the attack group was to return to the 1st Italian Army. The 10th Panzer Division had retired from Thala by early on 23 February and the 21st Panzer Division ended its attack on Sbiba on 24 February. The divisions were to refit and also rejoin the 1st Italian Army, ready for an attack in early March, the moves to be covered by minor operations on the 5th Panzer Army front. On 24 February, Arnim flew to Rome without consulting Rommel and advocated an offensive towards Béja, being convinced that the British First Army (General Kenneth Anderson), had sent reinforcements south from the northern front to save Sbiba and Thala. Arnim gained the approval of Kesselring for an attack on a wide front against the V Corps (Charles Allfrey) sector on 26 February.[4][3]
Axis plan edit
Unternehmen Ochsenkopf was a plan to penetrate the British defences on 26 February, with Korpsgruppe Weber (General Friedrich Weber) of the 334th Infantry Division, elements of the Luftwaffe Hermann Göring Division which had recently arrived and the parts of the 10th Panzer Division not involved in Unternehmen Frühlingswind (Operation Spring Storm), in three groups or horns, in the shape of a bull's head. The northern horn, with most of the tanks, was to advance on the route from Mateur from the north-east, to capture Béja 40 km (25 mi) west of Medjez.[5] The second group was to attack from Goubellat towards Sloughia and Oued Zarga to envelop the British at Mejez El Bab and the third group was to carry out a pincer attack in the Bou Arouda valley, then advance through El Aroussa to Gafour, with the objective of the road junction at El Aroussa. In the north, the improvised Division von Broich/von Manteuffel (Division von Manteuffel), in the subsidiary Unternehmen Ausladung (Operation Disembarkation), was to defeat the British in the Sedjenane valley, cut the communications from Jefna to Djebel Aboid and cover the northern flank of Korpsgruppe Weber. The operations would force the allies to withdraw and delay a further advance, while Rommel prepared the attack of the 1st Italian Army (the former German-Italian Panzer Army) from the Mareth Line defences against the Eighth Army.[2][6]
Unternehmung Ausladung edit

The subsidiary Unternehmung Ausladung began on the morning of 26 February, to outflank the British in Sedjenane and the high ground opposite Green Hill, with an attack on the hilly coastal strip to the north between the town and Cap Serrat. The area was lightly held by poorly-equipped French troops of the Corps Francs d'Afrique.[7] Division von Manteuffel led the attack with elite troops of the Luftwaffe Fallschirmjäger Regiment (motorized) "Barenthin" (Major Rudolf Witzig) and the Italian 10th Bersaglieri Regiment.[8] The Axis forces, with air support from the Luftwaffe made good progress across the hills held by the Free French between Cap Serrat, the railway and Sedjenane. The French managed to repulse an Italian attack but were then overrun and many were taken prisoner.[9] On 27 February, elements of the 139th Infantry Brigade of the 46th Infantry Division and attached No. 1 Commando, supported by the 70th Field and 5th Medium regiments RA, moved up to counter the German advance but lacked air support and were short of artillery ammunition, after taking part in the Battle of Kasserine.[7][9] Until 1 March, the British conducted expensive but successful counter-attacks, which delayed the Axis advance on the hamlet.[8]
On 2 March, a Durham Light Infantry (DLI) counter-attack was a costly failure and the battalion was withdrawn to a wooded area outside Sedjenane; more German attacks on Sedjenane that day and the next were defeated.[8] A counter-attack by a battalion of the Lincolnshire Regiment, the DLI and Churchill tanks of the North Irish Horse drove the Germans back in determined fighting. The British position became untenable due to withdrawals by the French further west in the Medjez area, when Axis troops occupied high ground dominating the town. The French commander had thought his position was being outflanked and ordered a withdrawal. The German penetration towards Béja and Medjez along with the French withdrawal had caught the 139th Infantry Brigade in a salient and two companies of Sherwood Foresters were overrun.[9] On 4 March, the British retreated 24 km (15 mi) from Sedjenane toward Djebel Abiod to stabilise the front.[7] The Axis attack on Djebel Abiod was delayed for five days by the defence of Sedjenane and it was not captured.[8][10]
Battle edit
Southern Horn edit
The southern horn of the operation was to be conducted by Kampfgruppe Audorff with the Hermann Göring Parachute Division, the 334th Infantry Division and supporting panzer battalions.[11] Protecting this area was a British force known as Y Division, an ad hoc force, which had been formed from the 38th (Irish) Brigade, a mixture of commandos, Grenadier and Coldstream Guards, elements of the 1st Parachute Brigade and Churchill tanks of C Squadron 142 (Suffolk) Regiment under command.[5] The kampfgruppe attacked on the evening of 25 February, their first objectives being Tally Ho corner, an important road junction and a knoll nicknamed Fort MacGregor.[12] The Luftwaffe had attacked the British positions and shot up transport behind the front. At Fort MacGregor, D Company of the East Surreys were attacked by the paratroopers of the Hermann Göring Division.[13] After two German attacks were repulsed, paratroopers blew holes in the barbed wire and the defenders were soon overwhelmed and destroyed.[12] Djebel Djaffa, further west, held by a battalion of French Colonial troops was attacked simultaneously by the paratroopers. The French were surprised and swiftly overrun, most being captured.[13]

A hasty counter-attack by the Surreys on Fort MacGregor was attempted but was stopped just forward of the start line and the Surreys withdrew with many casualties. British artillery bombarded the hill for several hours with all the medium and heavy guns and when the Surreys attacked again, it was empty save for six shell-shocked Germans.[13] The paratroopers had been devastated by the shelling and had no choice but to withdraw.[12] The summit was no bigger than a football pitch and was strewn with human remains, mostly German but also the British dead of D Company.[13] Allfrey sent forward the Lancashire Fusiliers, 600 men of No. 6 Commando, the 56th Reconnaissance Regiment, Valentine tanks of the 17th/21st Lancers, elements of the 51st Royal Tank Regiment (51st RTR) and the North Irish Horse.[7][12][14] The next day almost as soon as they arrived, the Surreys and the Valentines of the 17/21st Lancers counter-attacked Djebel Djaffa, which was recaptured after some resistance.[13]
The 334th Division struck at Tally Ho corner just before midnight, surprised and overran the commando garrison, whose survivors were rescued by Churchill tanks.[14] The Germans pressed on to a small ridge 6 mi (9.7 km) to the east of El Aroussa, where two battalions of the Hermann Göring Division and a supporting panzer company assaulted a position defended by the Churchill tanks of Suffolk Squadron, 142nd Regiment RAC. Firing from hull down positions, the Churchill tanks knocked out four Panzer IVs, disabled three Panzer IIIs and destroyed an 88 mm gun for the loss of a Churchill. The German infantry suffered many casualties and the survivors withdrew after determined resistance by the British infantry supported by massed artillery.[5] The British received reinforcements and counter-attacked after another bombardment, pushing the Germans back from Tally Ho corner into the hills east of the Medjez-El-Bab to El-Aroussa road during the night.[15][14]

After dark, the British advanced and mopped up halfway along the road to Steamroller Farm, held by about 2,000 men from two battalions of the Hermann Göring Division, elements of a panzergrenadier regiment, 5 cm Pak 38 and 88 mm anti-tank guns.[15] A squadron of the 51st RTR in Churchill Mk III tanks and a company of Coldstream Guards set off just before midday on 28 February and by 4:00 p.m. they were in sight of the farm.[16] German artillery-fire was directed at them and shortly afterwards they were attacked by Junkers Ju 87 (Stuka) dive bombers, losing five Churchills.[17] The 1st Troop pressed forward into the farm area with the Coldstream Guards but were pinned down.[18] Another Churchill tank, commanded by Second Lieutenant J. C. Renton, arrived and two tanks made a 1,500 yd (1,400 m) dash across an exposed causeway covered by an 88 mm gun. At 20 yd (18 m) the gun fired and grazed the turret, before the crew fled and the Churchill flattened the gun; the Churchills then reached the summit of the pass and surprised the Germans there.[17]
The tanks came across German transport and shot them up as they went by, then knocked out two Panzer IIIs and two anti-tank guns as they tried to deploy.[16] The Germans fled and as dusk fell the column was destroyed.[5] Hollands and Renton were ordered to rejoin their squadron but the leading tank stalled and had to be given a tow start. The tank sortie destroyed two 88 mm, two 75 mm, and two 50 mm anti-tank guns, four smaller anti-tank guns, 25 wheeled vehicles, two 3-inch mortars and the two Panzer IIIs and inflicted nearly 200 casualties.[17] The next day the French owner of the farm arrived at El Aroussa to say that the Germans had gone and the British occupied the area.[16] The depleted Hermann Göring Regiment had suffered many more casualties; its commander had assumed that the tank sortie was from a much bigger formation and sent a message to Fliegerführer Afrika that he had been attacked by a "mad tank battalion which had scaled impossible heights" and "compelled his ultimate withdrawal".[17]
Northern Horn edit
Kampfgruppe Lang had 77 tanks, including twenty Tigers of the 501st Heavy Panzer Battalion and motorised infantry from the 10th Panzer Division. The rest of the 10th Panzer Division was to attack once the objectives were achieved and advance westwards, about 25 mi (40 km) south of Medjez.[2] The area was held by the 128th (Hampshire) Infantry Brigade and numerous batteries of artillery.[19] On 26 February, the northern attack of Ochsenkopf commenced and the Germans quickly captured the Sidi Nsir hamlet and railway station, where the road and railway connecting Béja and Mateur diverged, the road east into the hills and the railway along the easier north-east route.[20][21] The 172nd Field Regiment RA, with three batteries of 25-pounder gun-howitzers, and 155 Battery, with eight 25-pounders, were dug in around a farm, with the 5th Battalion Hampshire Regiment. They were to monitor German movements but most were poorly-trained, with no battle experience.[2] At Hampshire Farm, the defenders were to absorb the first shock of an Axis attack on Béja, to give the defenders between Medjez and Beja at Hunt's Gap time to prepare. It was estimated the Germans attacked with thirteen infantry battalions, c. 13,000 men, with the supporting troops of two divisions c. (30,000 men) on the northern front.[22]

During the night, Verey light signals began to go up in the hills around Sidi Nsir, and at 6:30 a.m. next morning, German mortars began firing on the British guns. After 45 minutes, German tanks drove down the road from Mateur and four of the 25-pounders opened fire. No. 1 gun had been specially placed at the top of a slope to cover the approach from Mateur and fired over open sights. The leading German tanks ran onto mines, were damaged and withdrew with the infantry.[2] At 11:00 a.m. the Germans made another attempt on the left flank, but F Troop opened fire and hit four German tanks, setting them ablaze.[23] German infantry engaged B Company with small-arms fire, but were repulsed. Around midday, the Germans prepared to attack again, but massed British artillery fire broke up the attack before it began.[24]
By 1:00 p.m., thirty German tanks, self-propelled guns and infantry had worked round both flanks and were within 600 yd (550 m). The highest observation post was attacked, its wireless transmitter destroyed and telephone lines cut. Eight Messerschmitt Bf 109s fighters strafed each gun in turn all day, inflicting casualties and also attacked rear areas.[24] Several of the British vehicles on the road to Hunt's Gap were hit, and ammunition had to be salvaged at risk by the gunners. Bivouacs and ammunition dumps were also hit and left burning. Just after 2:30 p.m., German lorried infantry turned the southern flank by infiltrating forward under cover of a hill. At 3:00 p.m., German infantry commenced small-arms fire at close range and a column of tanks led by a Tiger moved along the road into the battery position, as thirteen more tanks gave covering fire from hull-down positions. The British gunners switched to armour piercing shot and knocked out three tanks, which blocked the road.[25]
At 5:30 p.m., another German attack on the remaining guns began; seven tanks were hit but one by one, the remaining British guns were hit by tank-gun and machine-gun fire.[2] By nightfall, only one 25-pounder and several Bren guns remained, engaging the German tanks at ranges of from 10–20 yd (9.1–18.3 m).[24] "Tanks are on us" was the last wireless message and Newham ordered the evacuation of battalion headquarters.[26] When the battle began, there had been nine officers and 121 other ranks; nine men reached British lines, seven of whom were wounded.[24] The defence of Sidi Nsir gained time to prepare defences at Hunt's Gap, a defile about 24 km (15 mi) north-east of Béja. The 128th Infantry Brigade had support from seventy-two 25-pounders, fifteen 5.5 inches (140 mm) medium guns and two squadrons of Churchill MK IIIs of the North Irish Horse.[27] A tank-killing zone had been prepared with minefields, anti-tank guns, hull-down Churchill tanks and direct fire areas for medium and heavy artillery. A cab rank of Hurricane Mk IID fighter-bombers, equipped with 40 mm Vickers S guns, circled overhead in communication with the ground, waiting for targets.[28]

On 28 February, Rommel ordered Oberst Rudolf Lang to hurry up and he ordered a pre-dawn attack by about ten Panzer IVs and lorried infantry after an artillery bombardment against the positions of B Company, 2/4th Hampshires.[29] Churchill tanks knocked out four Panzer IVs, which halted the attack.[30] The Germans then attacked again and penetrated C Company but the tanks of the North Irish Horse stopped the Germans until dusk. B Company was ordered to withdraw after a platoon was overrun and a second was in danger of collapse.[28] C Company was overrun by German infantry and armour later in the day but the attackers were unable to advance further.[10]
The next day Lang found he was only 10 mi (16 km) from Hunt's Gap but was down to six operational tanks.[31] The 2/5th Leicesters arrived and a thick fog fell across the valley, which hampered RAF sorties. The Germans attacked again and in the fog, D Company was surprised and a platoon was overrun but the rest of the attack was repulsed by artillery-fire and infantry of the 1/4th Hampshires. The fog lifted and immediately the RAF made eight sorties into the valley and caught German supply columns as artillery concentrations were directed by the Forward Observation Officers and Air Observation Post observers.[10][32] The German tanks and infantry suffered many casualties; the serpentine road which the Axis transport was using was turned into a wilderness of bomb craters and burning vehicles, which forced a withdrawal.[32][33] The 2/4th Hampshires held on to their last positions as the Germans tried to advance along a wadi to the south. The British surprised them with a counter-attack in which forty Germans were killed and sixty captured.[28] Further along the road towards Sidi Nsir, artillery broke up another German attack. Eight Tiger Is had been immobilized by mines and had to be blown up by their crews to avoid capture.[34] A British tank officer went forward to investigate, saw no sign of Germans, reached the tanks and found the turrets open and the crews gone.[35]
On 2 March, the Germans withdrew, having lost over forty tanks and nearly sixty other armoured vehicles; two out of the four German infantry battalions were taken prisoner, in addition to the killed and wounded.[28][32] Many of the prisoners had been on the Eastern Front and claimed that they had never experienced such a weight of bombardment.[35] The offensive had failed to achieve the main objectives and Arnim called off further attacks.[27] Anderson had considered abandoning Medjez, until the success of the defence of Hunt's Gap, the no retreat order issued by General Harold Alexander (commander of the 18th Army Group) and the end of the German attack, which saved the village. By 5 March, 2/4th Hampshires had lost 243 men killed or missing and were relieved by the 8th Battalion, Argyll and Sutherland Highlanders, of the 36th Infantry Brigade, 78th Division.[28]
Aftermath edit
Analysis edit

Weber ordered Lang to fall back to defensive positions; Rommel was dismayed when he heard that 19 Tigers had been destroyed.[36][37] Major Hans-Georg Lueder, commander of Schwere Panzer Abteilung 501 (Heavy Tank Battalion 501) was severely wounded and the detachment lost so many tanks that it ceased to be an effective fighting force.[38][34][39] None of the Axis operational objectives were met, despite gaining some ground in the west. The battle cost the Germans the initiative; at best they had only slightly delayed an Allied offensive.[40] The divisions needed for the attack of the 1st Italian Army on the Eighth Army were delayed for a week by the failure of Unternehmen Ochsenkopf and the Battle of Medenine was a costly failure.[41][42] Allfrey was promoted to major-general on 9 March.[43] An Axis success would have meant the loss of Béja and the retirement of the Allied line along the northern sector, including a withdrawal from Medjez el Bab, which would have prolonged the campaign and interfered with Allied plans for the Allied invasion of Sicily.[37]
Casualties edit

The Germans lost 71 panzers—nearly 90 per cent of the tanks used—while sixty other vehicles were destroyed or captured.[44] The Germans suffered nearly 2,800 casualties and another 2,200 men, who could not be easily replaced, were captured.[40] The British suffered 1,800 casualties and lost 2,300 prisoners, 16 tanks, 17 guns, 13 anti-tank guns and forty other vehicles.[45]
Subsequent operations edit
On 17 March, Axis forces were reinforced by the 504th Heavy Panzer Battalion, while the 501st repaired 25 of its tanks bringing it back up to quarter strength.[38] However, Ochsenkopf was to be the last major Axis offensive by the 5th Panzer Army in Africa.[1]
On 25 March, General Alexander ordered a counter-attack. On 28 March, the 46th Infantry Division attacked with the 138th Infantry Brigade, keeping the 128th Infantry Brigade in reserve and the attached 36th Infantry Brigade, 1st Parachute Brigade and French units (including a tabor of specialist mountain Goumiers). The division was supported by the field artillery of two divisions, medium and heavy guns. In four days, the 46th Infantry Division recaptured the ground lost to Division von Manteuffel and took 850 German and Italian prisoners.[46] Sedjenane was re-captured by the Allies on 1 April.[47]
On 7 April, Anderson ordered the 78th Infantry Division to clear the Béja–Medjez road. With artillery and close air support, the division methodically advanced 16 km (10 mi) through difficult mountain terrain for ten days on a 16 km (10 mi) front. The 4th Infantry Division moved up on the left of the 78th Infantry Division and pushed towards Sidi Nisr.[46] With the salient at Medjez relieved and lateral roads in the V Corps area cleared, Anderson began to prepare the big attack scheduled for 22 April to take Tunis. Within three weeks the Axis front collapsed and the 230,000 remaining troops in Tunisia surrendered.[37][46]
See also edit
Citations edit
- ^ a b Windrow 1972, p. 23.
- ^ a b c d e f Rolf 2001, p. 152.
- ^ a b Playfair et al. 2004, p. 305.
- ^ Howe 1991, pp. 464–466.
- ^ a b c d Perrett 1993, pp. 18–20.
- ^ Playfair et al. 2004, p. 306.
- ^ a b c d Atkinson 2013, pp. 399–400.
- ^ a b c d Villahermosa 2010, pp. 243–245.
- ^ a b c Dunning 2011, pp. 109–112.
- ^ a b c Holland 2006, pp. 496–500.
- ^ Stimpel 1998, p. 134.
- ^ a b c d Ford 1999, pp. 46–49.
- ^ a b c d e Evans 2012, pp. 112–115.
- ^ a b c Doherty 1994, pp. 43–45.
- ^ a b Flood 2013, p. 547.
- ^ a b c Crow 1971, p. 85.
- ^ a b c d Rolf 2001, p. 155.
- ^ Paget 2000, p. 318.
- ^ Perrett 2012, p. 128.
- ^ Perrett 2012, pp. 128–130.
- ^ Lewin 2012, pp. 177–179.
- ^ Perrett 2012, pp. 128, 137.
- ^ Perrett 2012, pp. 134–136.
- ^ a b c d Lewin 2012, p. 177.
- ^ Perrett 2012, p. 134.
- ^ Perrett 2012, pp. 137–139.
- ^ a b Bidwell & Graham 2004, pp. 258–259.
- ^ a b c d e Rolf 2001, p. 154.
- ^ Mitcham 2010, pp. 76–78.
- ^ Syron 2013, p. 113.
- ^ Schneider 2004, pp. 96–97.
- ^ a b c Lewin 2012, p. 180.
- ^ Hart 2001, p. 135.
- ^ a b Williamson & Bujeiro 2005, p. 28.
- ^ a b Marshal 1943, pp. 88–90.
- ^ Watson 2007, p. 114.
- ^ a b c Perrett 1993, p. 139.
- ^ a b Schneider 2004, p. 44.
- ^ NIH 2015.
- ^ a b Atkinson 2013, pp. 407–408.
- ^ Mitcham 2010, pp. 117–118.
- ^ Watson 2007, p. 119.
- ^ Anderson 1946, pp. 1, 351.
- ^ Atkinson 2013, p. 408.
- ^ Coggins 1980, p. 134.
- ^ a b c Anderson 1946, p. 11.
- ^ Ferguson 1984, p. 10.
Bibliography edit
Books
- Atkinson, Rick (2013). An Army At Dawn: The War in North Africa, 1942–1943. The Liberation Trilogy. Vol. I. London: Hachette UK. ISBN 978-1-40552-727-9.
- Bidwell, Dominick; Graham, Dominick (2004). Fire Power: The British Army Weapons & Theories of War 1904–1945. Barnsley: Pen and Sword. ISBN 978-1-84415-216-2.
- Coggins, Jack (1980). The Campaign for North Africa. New York: Doubleday. ISBN 978-0-38504-351-9 – via Archive Foundation.
- Crow, Duncan, ed. (1971). British and Commonwealth AFVs, 1940–46. Armoured Fighting Vehicles of the World. Vol. III. Leatherhead: Profile Publications. OCLC 278597.
- Doherty, Richard (1994). Only the Enemy in Front (every Other Beggar Behind–): The Recce Corps at War, 1940–1946. London: Tom Donovan. ISBN 978-1-87108-518-1.
- Dunning, James (2011). When Shall Their Glory Fade: The Stories of the Thirty-Eight Battle Honours of the Army Commandos. London: Frontline Books. ISBN 978-1-84832-597-5.
- Evans, Bryn (2012). With the East Surreys in Tunisia and Italy 1942–1945: Fighting for every River and Mountain. Philadelphia, PA: Casemate. ISBN 978-1-78337-673-5.
- Ferguson, Gregor (1984). The Paras 1940–84. Elite. Vol. I. Oxford: Osprey. ISBN 0-85045-573-1.
- Flood, Joe (2013). Unravelling the Code. Raleigh, NC: Lulu.com. ISBN 978-0-99232-810-8.
- Ford, Ken (1999). Battle-axe Division: From Africa to Italy with the 78 Division 1942–45. Stroud: Sutton. ISBN 978-0-75091-893-0.
- Hart, Russell (2001). Clash of Arms: How the Allies Won in Normandy. Boulder, CO: Lynne Rienner. ISBN 978-1-55587-947-1 – via Archive Foundation.
- Holland, James (2006). Together We Stand: America, Britain and the Forging of an Alliance. New York: Miramax Books. ISBN 978-1-40135-253-0 – via Archive Foundation.
- Howe, G. F. (1991) [1957]. Northwest Africa: Seizing the Initiative in the West. United States Army in World War II: Mediterranean Theatre of Operations (online ed.). Washington: Department of the Army. ISBN 0-16001-911-7. OCLC 23304011. Retrieved 2 June 2015 – via Hyperwar.
- Lewin, Ronald (2012). The War on Land: 1939–45. New York: Random House. ISBN 978-1-44810-412-3.
- Marshal, Howard (1943). Over to Tunis: The Complete Story of the North African Campaign. London: Eyre & Spottiswoode. OCLC 2056845.
- Mitcham, Samuel (2010). Blitzkrieg No Longer. Barnsley: Pen and Sword. ISBN 978-1-84884-302-8.
- Paget, Julian (2000). Second to None: The History of the Coldstream Guards 1650–2000. Philadelphia, PA: Casemate. ISBN 978-1-78337-939-2.
- Perrett, Bryan (1993). Churchill Infantry Tank 1941–51. Oxford: Osprey. ISBN 978-1-85532-297-4.
- Perrett, Bryan (2012). Last Stand: Famous Battles against The Odds. London: Hachette UK. ISBN 978-1-78022-526-5.
- Playfair, I. S. O.; Molony, C. J. C.; Flynn, F. C.; Gleave, T. P. (2004) [1966]. Butler, J. R. M. (ed.). The Mediterranean and Middle East: The Destruction of the Axis Forces in Africa. History of the Second World War United Kingdom Military Series. Vol. IV (facs. repr. Naval & Military Press, Uckfield ed.). London: HMSO. ISBN 1-84574-068-8.
- Rolf, David (2001). The Bloody Road to Tunis: Destruction of the Axis Forces in North Africa, November 1942 – May 1943. London: Greenhill Books. ISBN 978-1-85367-445-7.
- Schneider, Wolfgang (2004). Tigers in Combat. Vol. I. Mechanicsburg, PA: Stackpole. ISBN 978-0-81173-171-3.
- Stimpel, Hans-Martin (1998). Die deutsche Fallschirmtruppe 1942–1945: Einsätze auf Kriegsschauplätzen im Süden (in German). Vol. I. Berlin: Mittler E. S. & Sohn. ISBN 978-3-81320-577-0.
- Syron, Mike (2013). Panzerkrieg: The Rise and Fall of Hitler's Tank Divisions. London: Hachette UK. ISBN 978-1-47210-780-0 – via Archive foundation.
- Villahermosa, Gilberto (2010). Hitler's Paratrooper: The Life and Battles of Rudolf Witzig. London: Frontline Books. ISBN 978-1-47380-553-8.
- Watson, Bruce Allen (2007). Exit Rommel: The Tunisian Campaign, 1942–43. Stackpole Military History. Mechanicsburg, PA: Stackpole. ISBN 978-0-8117-3381-6.
- Williamson, Gordon; Bujeiro, Ramiro (2005). Knight's Cross and Oak Leaves Recipients 1941–45. Osprey. ISBN 1-84176-642-9.
- Windrow, Martin (1972). Luftwaffe Airborne and Field Units. Osprey. ISBN 978-0-85045-114-6.
Journals
- Anderson, Lt.-General Kenneth (1946). "Official despatch by Kenneth Anderson, GOC-in-C First Army covering events in NW Africa, 8 November 1942 – 13 May 1943". London Gazette. London. ISSN 0374-3721.
Websites
- "North Irish Horse - The Goatherds of WW II". northirishhorse.net. 2008. Retrieved 4 June 2015.
Further reading edit
- Chant, Christopher (2013). The Encyclopedia of Codenames of World War II. London: Routledge. ISBN 978-1-13464-787-3.
- Fraser, David (2011). And We Shall Shock Them: The British Army in the Second World War. London: A & C Black. ISBN 978-1-44820-482-3.
- Jaques, Tony (2006). Dictionary of Battles and Sieges: A Guide to 8,500 Battles from Antiquity through the Twenty-first Century. Santa Barbara, CA: Greenwood Press. ISBN 978-0-31333-536-5.
- Macksey, Kenneth (1969). Crucible of Power: the Fight for Tunisia, 1942–1943. London: Hutchinson. ISBN 0-09098-880-9.
- Mallett, D. R. (2013). Hitler's Generals in America: Nazi POWs and Allied Military Intelligence. Lexington, KY: University Press of Kentucky. ISBN 978-0-81314-253-1.