


Summary
A woodworking vise is a type of vise adapted to the various needs of woodworkers and woodworking. Several types have evolved to meet differing primary functions, falling under the general categories of front and end vises, reflecting their positions on a workbench.

Bench location edit

There are two main locations for a vise (vice in UK English sp.) or vises on a workbench: on the front, a workbench's long face, known as a "front" ("face", or "shoulder") vise, and on the end, known as a "tail" vise. Either or both may be mounted on the right side of their face to allow a workpiece extending from them to be more easily worked by a right-handed person, though a common arrangement is with the front vise mounted on the left of a long side and the tail on the right side of the diagonally opposite end.
Aids edit
A woodworking vise holds work in its jaws, or compressed against a bench dog or holdfast. Holes to receive these stops or clamps are typically drilled in line with a vise in 3-4" intervals, with others added to the benchtop to serve various purposes.
Screw variations edit
In addition to the single screwed standard iron-jawed vise there are both quick-release and twin-screw variations:
Quick-release edit
A quick-release (or "quick-action") vise employs a split nut that allows its screw to engage or disengage with a half-turn of the handle. When disengaged the movable jaw may be moved in or out throughout its entire range of motion, vastly speeding up the process of adjustment. Common thread types are Acme and buttress.
Twin-screw edit

A twin-screw vise allows for secure clamping of larger workpieces. The design was popular during the late eighteenth and early nineteenth centuries, particularly with chair makers. A modern evolution connects the screws with a chain, keeping them slaved together and turned by either handle. They may also be decoupled to hold tapered work.
This design has many of the advantages of the classic shoulder vise and single screw face vise, with few of the disadvantages. It can also be used effectively as an end vise. Its main drawbacks are its expense and relatively difficult installation.
Front vise types edit
Leg edit

Probably the oldest front vise design is the leg vise, which uses one of the bench's legs as its inside jaw. The outside jaw also goes nearly to the floor. A single is screw mounted between a quarter and a third of the way down that goes through both jaws. At its base either a board that can be adjusted by means of holes and pegs acts as a fulcrum, or a second screw is installed. The leg vise is probably the simplest and least expensive of the front vises, and it is very strong.
Shoulder edit

Another old design is the shoulder vise. The best thing about this design is that it allows clamping directly behind the screw. This yields unobstructed vertical clamping for cutting dovetails and similar operations. There is also typically a little play in the screw/jaw attachment that provides for clamping of tapered work. This is one vise that should be designed into the bench from the beginning, as it is difficult to retrofit into an existing bench. The primary drawback of the shoulder vise is its fragility, unless the "arm" is attached to the "end cap" using a dovetail or finger joint, usually glued or "pinned" to eliminate rotative movement about the joint, otherwise it is fairly easy to break it with a big steel bench screw. But one should never really have to put that much force on it. Some woodworkers say that the big vise gets in the way of some jobs, others find it unobtrusive. Implicit in a shoulder vise is an integral planing stop, formed by the intersection of the jaw and the jaw spacer, and which allows the shoulder vise to perform multiple duties, such as jointing long boards with a "bench slave" to hold the opposite end. In earlier times, a crochet and a holdfast would perform the same function.
Hybrid edit

Many of the commercial European benches have a front vise that uses a wooden jaw with a metal screw and built-in anti-racking hardware. These vises are also available as inexpensive kits that can be mounted on almost any bench.
Patternmaker's edit

The patternmaker's vise is sometimes used as a front vise. This style was originally designed for patternmakers, the folks who make the forms used in metal casting. Pattern making is exacting work using shapes not normally encountered by a cabinetmaker. The patternmaker's vise can hold odd shapes at various angles, and it can certainly hold simple shapes at regular angles. The drawbacks of this vise are the expense, the moderately complicated mounting, and a tendency to fragility. The most sought-after is an antique Emmert, but there are several clones on the market today, including one by Lee Valley Tools that is made of an aluminum alloy—which should be less likely to break—and several from Taiwan and which are clones of the smaller Emmert. A possible disadvantage of the patternmaker's vise is it usually requires installation on a bench which is at least 1-3/4" thick
Front vise comparison edit
| Vise Type | Cost | Advantages | Disadvantages |
|---|---|---|---|
| Leg Vise | Low | Strong design Adaptable |
Can be cumbersome to set Not good for those who dislike stooping |
| Shoulder Vise | Low | Work clamped directly under screw Can clamp work vertically Can handle tapered work It is theoretically possible to clamp workpieces which are as tall as the floor-to-ceiling distance |
Relatively complex and potentially fragile design Bench slave or deadman required for jointing Shoulder gets in the way of some work |
| Hybrid Vise | Medium | Relatively wide face Wood clamping surfaces Can be made to fit a range of installations |
Not ideal for vertical clamping Prone to racking |
| Quick Action Vise | Medium | Strong design Can be set one-handed quickly Relatively simple installation |
Not ideal for vertical clamping Bench thickness critical |
| Pattern Maker's Vise | High | Most versatile Can clamp odd shapes at odd angles Can be retro-fitted to existing bench |
Somewhat fragile Bench thickness critical |
| Twin Screw Vise (Used as front vise) |
High | Very strong design Can clamp work vertically Good for jointing Can handle tapered work |
Relatively difficult installation |
End vise types edit
Traditional edit

The traditional tail vise uses one large screw, either wooden or metal. It is made in the form of a frame, with the back part of the frame fitting under the bench, and the movement of that frame located and restrained by a complex system of sliding tongues and grooves, and runners, such that smooth left and right movements of the frame are possible, but forward and backward movements, or rotative movements of the frame are impossible. The jaw has a face that contacts the bench top, and it has one or more dog holes on the top—often 3 to 4, each spaced 5 inches apart—that are in line with the dog holes located on the front face (apron) of the bench—numerous holes, each also spaced 5 inches apart. This is the least expensive option for a tail vise, but it is by far the most complex to design, construct and maintain. Tage Frid and Frank Klausz popularized this type of tail vise in North America, although its origin dates back to northern Europe (most probably Germany) in the 18th century.
Wagon or enclosed edit
This traditional tail vise also uses one large screw, either wooden or metal. It consists of a movable block with one or more dog holes in it, the movable block rides in a large mortise in the workbench. The jaw has a face that contacts the bench top, and the dog holes are in line with the dog holes on the bench top. The two main varieties of this vise depend on whether the screw nut is mounted in the bench or on the dog hole block. When the screw nut is mounted on the dog hole block the installation is more complicated and expensive, but the screw does not move in and out as the vise is used.
Modern edit

A newer form of tail vise does away with the need of a frame. It uses steel plates for its structure - one steel plate with the nut is mounted on the side of the bench, two others are built into a sliding jaw along with the bench screw. This is a robust design and it's easier to install and adjust than the older style. However, only a few sizes are commercially available (although larger sizes have been custom made).
Face vise as end vise edit

A steel quick-action vise doesn't suffer so much from this problem. With one exception, it functions well on the end of the bench.
End vise comparison edit
| Vise Type | Cost | Advantages | Disadvantages |
|---|---|---|---|
| Traditional Tail Vise | Low | Classic design Can be made with all wood parts |
Relatively difficult to build and install Relatively fragile, unless constructed using dovetail or finger joints Unconstrained as to size and capacity It is theoretically possible to clamp workpieces which are as tall as the floor-to-ceiling distance, between the jaw and the apron |
| Wagon Vise/Enclosed Tail Vise (Nut in Bench Top) |
Low | Strong design Can work on top of vise without damaging the mechanism Can be made with all wood parts |
Cannot clamp large workpieces in the jaw Screw can get in the way when clamping long pieces Not good for pulling things apart |
| Wagon Vise/Enclosed Tail Vise (Nut in Movable Dog Hole Block) |
High | Very strong design Can work on top of vise without damaging the mechanism Screw never projects out of the bench |
Cannot clamp large workpieces in the jaw Relatively difficult installation |
| Leg Vise (Used as end vise) |
Low | Strong design Can handle tapered work |
Can be difficult to align Can be cumbersome to set Not good for those who dislike stooping |
| Hybrid Vise (Used as end vise) |
Medium | Relatively easy installation Can be made to fit a range of installations |
Not particularly suited to this application Prone to severe racking and wear |
| Quick Action Vise (Used as end vise) |
Medium | Can be set one-handed quickly Relatively simple installation |
Bench thickness critical Puts dog hole strip farther from the bench edge |
| Modern Tail Vise | High | Strong design Easier to install and align |
Some construction still required for the "core", about which are mounted the steel slides, and in which are located the dog holes Only a few sizes of steel slides are commercially available (about 15" and about 19"), but other sizes have been custom made |
| Twin Screw Vise (Used as end vise) |
High | Very strong design adaptable for multiple dog hole strips |
Relatively difficult installation |
Gallery edit
-
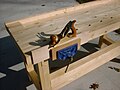
 Wedges used to tension a board being planed between a pair of bench dogs
 -
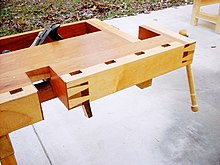
 An inexpensive and easy to install iron vise


References edit
https://www.woodworkmag.com/woodworking-vises-types/